In busy feeds where shoppers are scrolling quickly, your ads need to stand out and grab attention. Image Templates make this easy by automatically applying eye-catching designs to your product images. With this feature, you can create scroll-stopping ads without needing a designer or spending extra time on manual edits.
What are Image Templates? #
Image Templates are pre-designed layouts that you can apply to your product images. They help you:
- Highlight sales events, like Black Friday or seasonal promotions
- Keep your ads looking professional and consistent
- Save time by skipping manual design work
- Customize your campaigns by uploading your own frames and designs
When you select a template, it adds design elements (such as banners, seasonal frames, or sale tags) directly on top of your product images. You can also upload and apply your own custom frames to fully match your brand’s style.
How to Set Up an Image Template #
- Go to the Image Template tool. You’ll see a preview of your images along with design options to choose from.
-
Choose a design or upload your own
- Select from the available templates, such as seasonal promotions or sale banners.
- Or, click Upload design to add your own custom frame. This is great if you want unique branding or a consistent campaign style. The preview on the right updates instantly so you can see how it looks on your product images.
-
Adjust the product image
- Use the Fit option (fit, fill, or extend) to control how the product image sits inside the frame.
- Fine-tune the X and Y position, width, and height with sliders for the perfect look.
-
Add an overlay (optional).
You can add your company logo or brand mark as an overlay.
- Adjust its position and size with the sliders until it looks right.
- If needed, upload a new overlay or remove the current one.
- Add a price badge (optional). The Price Badge layer lets you display pricing information directly on your product images, including:
-
Price
-
Compare-at price
- Discount (as % or amount)
-
Price
- Preview your template. On the right-hand side, you’ll see previews of your template applied to different product images. This helps you check that everything looks consistent and engaging.
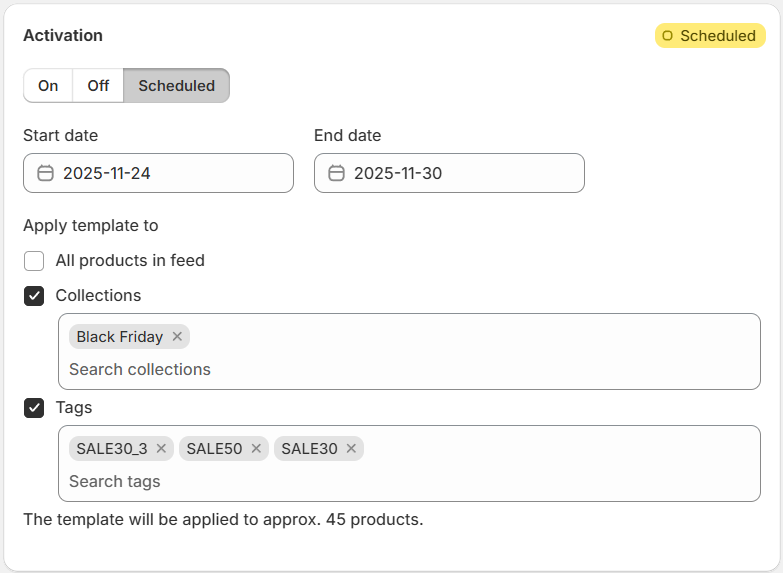
- Activate your template. At the top, toggle On to make the template active. You can also schedule activation for a future date, which is useful for time-sensitive promotions like holiday sales.
-
Apply templates to specific products using filters.
Image templates can be applied selectively using collection and tag filters. This is useful when targeting a specific group of products, such as seasonal collections or promotional items.
- Select one or more collections (e.g. Black Friday)
- Add relevant product tags (e.g. SALE30_4)
- Or choose to apply the template to all products in the feed
Use Cases #
Here are some ways you can make the most of Image Templates:
- Black Friday and Cyber Monday: Add bold “Sale” frames that immediately catch attention.
- Seasonal promotions: Refresh your ads with designs tailored to Spring, Summer, Fall, or Winter.
- Holiday campaigns: Use festive templates for Christmas, Valentine’s Day, or Halloween to stand out in holiday feeds.
- Brand launches: Upload your own branded frames to create a unique, professional look without a designer.
-
Limited-time offers: Schedule templates so your ads automatically update when the promotion starts, saving you setup time.
Technical Details #
- Image Templates currently produce square output (1:1), suitable for most Meta ad formats. Support for 9:16 and 4:5 is coming soon.
- Upload design files as square PNGs with transparent areas where the product should show.
- Recommended size: 1080 x 1080 pixels, up to 10 MB.
- PNG format is required to maintain transparency and fast performance across your catalog.
Adjust the product image #
When applying a template, you’ll want your product to display correctly inside the frame. You can control this with three options:
-
Fit
The image scales down (or up) so the entire product image fits inside the frame. Nothing gets cut off, but this may leave empty space around the edges, depending on the original aspect ratio. -
Fill
The image fills the entire frame. This avoids empty space, but it may crop part of your product image if the aspect ratio doesn’t match the frame. -
Extend
Facebook requires square images for product and carousel ads. By default, they just crop extra pixels from the edges to make your image square - which can result in important parts of your product being cut off.
What you actually want most of the time is to “add pixels” rather than crop them. That’s what Extend does.
Extend fills the extra space by extending the edge pixels of your image, creating a natural-looking background without distorting the product. This method (sometimes called an affine clamp) works especially well for product photos with a plain or uniform background.
💡 Tip: Use Extend for most catalog product images. It keeps your product intact while meeting Meta’s image requirements.
Adjust the price badge #
Choose or Upload a Badge Design
Pick a badge from the gallery, or click Upload price badge to use your own design.
To remove your custom badge and go back to the default selection, click Reset price badge.
Enable Show price badge only on discounted products if you only want the badge to appear when a compare-at price exists.
This is useful for sales campaigns, because full-price items won’t show an empty discount badge.
Position and Size Controls
Each badge element can be adjusted individually:
- Image (badge background)
- Price
- Compare-at price
- Discount
For each element, you can fine-tune:
- X and Y position
- Width (W) and Height (H)
This gives you full control over placement, even for different badge shapes.
Text Settings (Price, Compare-at, Discount)
For each text layer, you can configure:
- Font
- Font weight (Regular / Bold)
- Text colour
- Alignment
- Prefix and suffix (e.g. “$”, “%”, “Save”)
For the Discount layer, you can choose whether it shows:
- Percentage (e.g. 25%)
- Amount (e.g. $15)
Important Disclaimer (Meta Ads)
If you use the Flexify price badge feature, Meta’s own dynamic overlays must be disabled.
In Advantage+ Catalog Ads, go to:
- Advantage+ creative
- Enhancements
- Disable Add dynamic overlays
Otherwise, Meta may add its own price overlays on top of your badge.
Tips for Best Results #
- Keep your logo overlay small so it doesn’t distract from the product.
- Preview across different products to ensure the design works well on all image types.
- Use scheduling to prepare promotional campaigns ahead of time.
- Upload custom frames to perfectly align with your brand identity.
- Choose bold, high-contrast designs that stop the scroll and highlight your message.
Usage Notes #
How Activation Works With Image Optimization
- If Image Optimization is turned on, activating Image Templates will take priority and overwrite optimized images in your feed.
- When templates are switched off, optimized images are automatically restored.
Monthly allowance and pricing
Your plan includes 500 free image transformations every month. After that, every additional 1,000 transformations costs $4.
Billing is per unique image
You are only billed for a transformation once per new image generated - not per impression or reuse. If the same generated image is displayed multiple times, it is not charged again.
What counts as a billable event
A new transformation is billed only when:
- The template changes
- The product image changes
If neither changes, the image is considered the same and is not billed again.
Rollover credits
Transformation credits never expire. Any unused credits will automatically roll over to future months.
Cost example
If you typically generate around 1,000 new images per month, your out-of-pocket cost would be approximately $4 every two months.
Managing multiple templates and versions
Keep track of template variations to avoid triggering unnecessary new transformations. Even small edits to a template create a new billable version once an image is generated from it.
Recommended workflow when redesigning templates
To help avoid additional image template charges while redesigning, create a second image template and keep it turned off while you work on the new design. Adjust and test that inactive template until the design is final. Avoid forcing full catalog refreshes or large product resyncs while experimenting, and test on a small product set or test collection first, where possible. Only turn the new image template on once the final design is approved. After that, run one final regenerate or resync and monitor your remaining free and paid image credits.
Important: Avoid keeping an image template active while you are still experimenting. Active templates can generate new images during feed generation, catalog refreshes, or Meta recrawls.
How feed updates and crawler sync work
When you update an active image template, Flexify updates the feed immediately. However, Flexify does not control when Meta’s crawler fetches the updated feed data. Once Meta detects updated image URLs in the feed, it may recrawl and download those images on its own schedule. This can lead to additional image generation and related costs if an active template is still being changed while you are experimenting.
Track Usage
On the Flexify Overview page, you can monitor your overall image usage - showing both optimization and template transformations, along with your remaining free and paid credits. Quickly checking this helps you keep track of consumption for billing and budgeting purposes.